Envision, Create, Share

Welcome to HBGames, a leading amateur game development forum and Discord server. All are welcome, and amongst our ranks you will find experts in their field from all aspects of video game design and development.

Mapping Workshop I

Mapping Workshop I: Basic RM Mapping Concepts


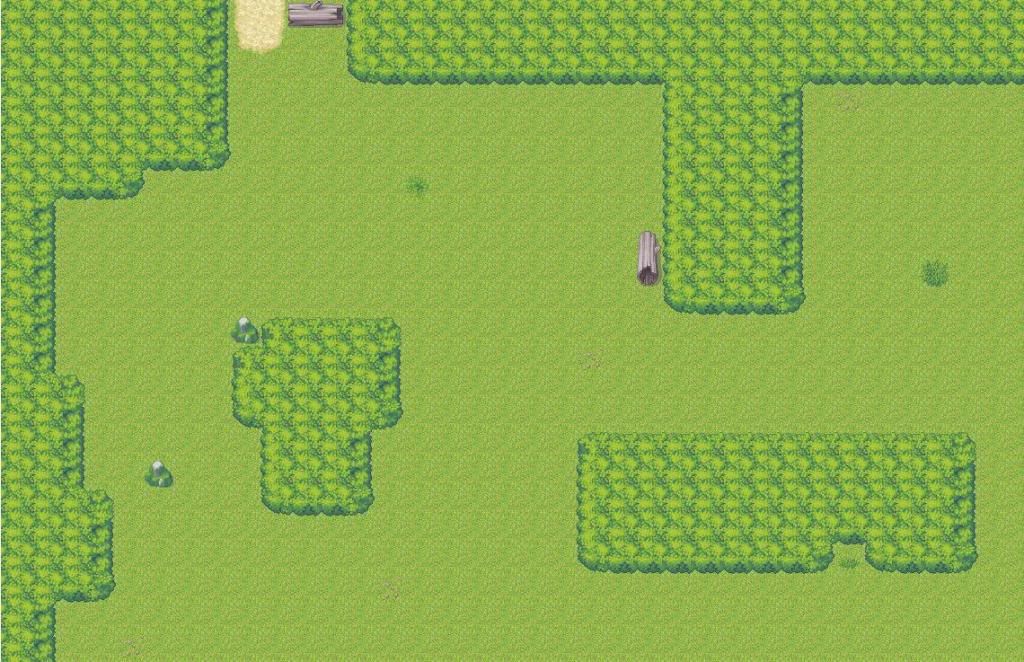
Mapping in 2D can be a complicated task. It isn't just just throwing a bunch of tiles onto a 2D plane and hoping for the best and instead requires careful planning and tile placement. Certain aspects come into play such as avoiding symmetrical mapping and how palette coincides with the mood and tone of a map. These are more advanced aspects and ones I hope to address eventually.

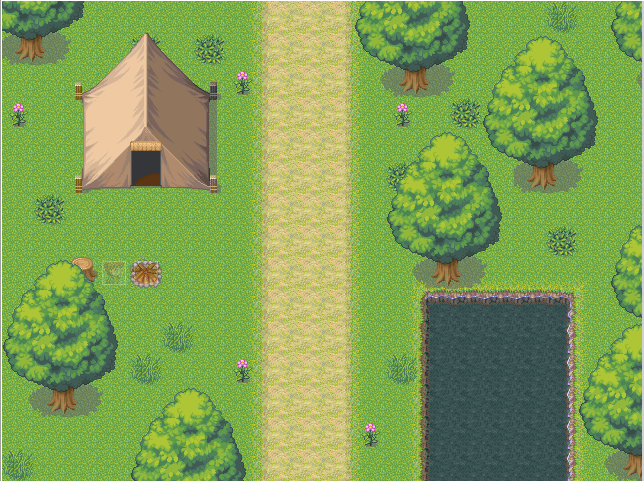
I think that while the XP and VX RTP are not the best set of tiles, they provide a base that everyone can use and learn from. This workshop is the first part of basic and intermediate mapping of the RTP. The workshop will contain tutorials on basic mapping. The goal of this is to inform members and mappers on the importance of a good map. Hopefully, anyone who reads this will learn a thing or two.

The mapping and example shown are basic examples and do show some mistakes! The reason is that I am trying to avoid edits of the RTP and trying to show progression. Some of the mistakes will be address and then eventually changed in further tutorials. Again, its more to show progression.

This workshop will be split off into different parts located below.
 
I) Why Mapping is Important


Mapping is important for many reasons. First off, it is the plane that the player will be playing the entire game on. Theme, atmosphere, mood, and tone will all be affected with the quality of mapping used. Mapping needs to be seemless; you dont want to break the immersion of the player. By breaking the immersion level of the player, the atmosphere is less strong and in most cases, doesn't really exist at all. Why is the gaming atmosphere important? Because this is the base of where all your characters live. If the world and its citizens are not believable, then the story and characters won't be as believable either. By giving a tangible world where characters live and die, it is easier to set up plot points and elements in story. A dragon killing 1000 citizens and burning down the town will only be significant if the player connected emotionally to that town. There are other elements to this such as NPCs and plot and lore building, but mapping will set up the base for this connection to take place. The latter will build on the map and without its base, it is almost impossible to make something seem significant without proper mapping.

Atmosphere is crucial in creating a tangible world. What most mappers tend to forget is the adjective in a place. Instead of forest, making it spooky forest or happy squirrel forest. Even this though can be shallow. Go deeper. Make it spooky forest where the tribe of evil spiders live or the happy squirrel village that is now in ruins because the evil hummingbirds attacked. It may sound silly, but adding a mini-story inside of a story is appealing. The idea is that you want to make your maps as specific as possible. Why? It makes them memorable. Having memorable maps that are enjoyable make your game enjoyable and add a sense of life and lore to your world. The idea behind it is to try to create something that sticks. There is going to be a difference between a creepy forest where the spiders live and a creepy forest where evil tribespeople live. Think about how to differentiate between the two.


So where the hell are my examples you crazy asshole?
Here.
So here is the background story. Poor Suzy is sick with a deadly disease and her single parent doesn't have enough money to pay for the treatment because she has 4 other kids.
lovely1.png


Obviously, as a player, I really don't like how terrible the mapping is. I dont care how sad this scene is, the mapping is atrocious. Suzy can die a horrible death i really dont care.

lovely2.png

So now we have a redo of the house. But to be honest, the mom looks like a lying piece of blueberry pie. They are loaded. Why cant they afford medicine? Also, where do the kids sleep? Why would you put a dresser in front of a window? All of these things raise questions in the logic of this household.

lovely3.png

The last redo. This looks like a poor home. It also looks like someone in the household drinks a lot.

So why is mapping important? To summarize, it creates the base for a good atmosphere in your game. It keeps players immersed in your game and creates the initial reaction of each individual location, which in turn, creates a base for your world-building. This reaction is important as it will set up feelings and emotions of the player. A game isn't creepy unless it creates a good atmosphere. And you cant create a good atmosphere without having a good map.
 
II) The Importance of Layers

There are only 3 layers in XP and 2 layers in VX when it comes from mapping. This means that you have to be careful about what you put on which layer. Why? Because careful placement of objects will lead to better organized maps. Not only that, you will be able to fit more stuff into your map.

Here is a breakdown of a forest using only 3 layers. Please ignore the inconsistencies.
forest1.png

The first layer. This consists of autotiles.

forest2.png

The second layer. Trees are being placed along with other details.

forest3.png

The final third layer.

So how exactly do you work with each layer?
  • The first layer should be used with autotiles and tiles that fit the whole 32x32 tile without any transparency unless you are placing it in the middle of an autotile section. This is where your blueprint should be.
  • The second layer should be used for detailing basic details. This is where you will put windows and tables and stuff like that.
  • The third layer is where all of the little details come into play. Things like vases with flowers and shrubbery are best put in the third layer.

Mind you, this is not always going to be the case. Sometimes you are going to need to put an object on top of another or vice-versa.

Again, by keeping check on each layer and being careful on what you put on which layer, your maps will be better organized and you will be able to put more in. Ive found that I am able to fit almost everything I want in a map 95% of the time only using three layers. Saying that it is impossible is an excuse. Here is another breakdown only using the house from the above section.

indoors1.png

indoors2.png

indoors3.png
 
III) Autotiles

Autotiles play a crucial role in breaking up the monotony in maps while allowing the player to explore the map. Not only that, using autotiles will reduce clutter. Clutter is a whole different topic that I will discuss in a later workshop. This section is mainly just to discuss how to map different autotiles. Im not going to go into specifics with each name and stuff like that but instead show examples.

mt1.png


Here is an example using a dirt path. The curviness depends on what your place is like. Because my path is built around the trees, it tends to be more curvy.

one.png

While this map is a bit cluttered, one thing to notice is the autotiles that create the dead soil. It is utilized the same as Dirt Paths but instead I stack two autotiles on one another using different layers. Stacking autotiles that fit together is a great way to add to a map and make it more detailed without adding another object

desertmap1.png

One of my biggest pet-peeves. This is not how you map undulations. You do not stack it on the same type of tile!!! It looks terrible. I used to be a culprit of it too but it doesn't add to a map. They do not look like hills, they look like mini mountain mounds that make absolutely no sense.

undalations%20right1.png

Instead, you use them to separate two different types of tiles. Not you can make that dried up river of your dreams or something silly like that.

forestmap.jpg

This is an example of what you do not want to do. In my experiences with mapping, the tree autotiles are terrible and should just be scratched. The reason being is that the perspectives do not match.
Tindy":2c5mia8u said:
The way that the "forest" autotile is meant to be used, at least as far as I have been able to figure out, is only to mark the bottom and sides of a map (to make it a closed-in map, that is). When it's placed on the top as you have it, it looks like bushes, because there aren't any tree trunks visible. Being that this is a 3/4 mapping style, you NEED to be able to see tree trunks from that angle. Otherwise, it's just borked and doesn't look good.

gah%20mistakes.png

There is a lot wrong with this map. These are a few common mapping mistakes I tend to find. Starting from left to right:
  • You never use the square tool you put that down right now mister. Dont even look at it!
  • Notice the outlining. That doesnt represent a change in height that represents bad mapping technique. You use that on top of the dirt to create grass in the middle.
  • This is too sparse.
  • Some thing as the undulations. It makes no sense. Why are there random bricks? I see people using this for paths but this is not a path autotile so dont treat it as one!

Road1withTent.png

This is an example of being too square: the water, the path, etc.

So how do I map autotiles?
  • Never use the square tool. The pencil tool is your best bet.
  • Don't overuse autotiles. Vary them up and use different types.
  • Autotiles need to be combined with something. You cant make a map with just autotiles. Make sure to add scenery. Walls work great with autotiles. Remember that they are there to break up monotony, not to ail it.
 
IV) Walls

So why am I making a whole section about walls? Walls are one of the best things to use in maps. They can direct and lead the player to their next destination, create busy-ness in a map, and they can remove clutter in a map. Walls include everything from cave walls to cliffs. In a way, think of them like autotiles. They create action for the eye without making the player walk in a constrained path.

bigscrenshot.png

The Before. The walls use straight lines. Curves aren't interesting.

MAP017.png

The after with more curvy walls. If you also look, there are a lot less objects.

The last thing you want to do is clutter your map and add a bunch of objects to substitute the lack of detailing. The reason being is that your map will look less concise and tight. Walls add a sort of detailing without sacrificing too much actual walking space.

I cant teach you how to map walls but I can give you some tips.
Some tips:
  • Try to avoid straight walls unless its a house. Straight cliffs and walls will add a linear feeling to your map and make them less appealing.
  • Remember your layers. try to stick as much as you can on layer one.
  • Remember height. If a wall is 3 tiles high, make sure every section of that wall is 3 tiles high.
  • Use autotiles with nice walls and cliffs!
  • The tileset provides various walls of the same types (2 types of lava walls). Use them to your advantage. Create as much variety as you can.

ghj.png

Look how many objects are in this map. 2.

satsdat.png

Even though this might get boring to look at after a while look how many objects are in it.

59135483.png

There is almost no scenery and it still looks somewhat busy.
 
This is it for the first part of the tutorial set. I did not address everything. Hopefully further workshops will address certain issues. Things that will come up eventually are:

  • Object Mapping Tips
  • How Object Clutter Ruined My Marriage
  • Symmetrical Mapping: Its Not Always Good Being Square
  • Mapping and Palette: Setting the Scene and Creating Mood

So you are probably wondering where the workshop part is?
Here are some basic challenges and ideas to get you started. The idea is that you post maps that you make and I try to help you fix the errors that are in the map.
This workshop runs for two weeks. In addition to helping people, I will also be doing additional challenges throughout the weeks, things such as me posting a map and members telling me the errors.

Getting You Started!


  • Create a map only using cliffs. No objects.
  • Create a map using only the pencil tool
  • Create a forest map by layering tree
  • Create a map that uses 3 matching autotiles. Extra bonus points for using correct undulations!

These are just some examples to get you started. Post anything and everything here and I will critique it using the lesson above.
 
you could probably ***really*** do without the obnoxious chiptune

I did it for me so i would have something to listen to you dont need to be such a cranky jelly dough-butt

okay sorry geez!! monsieur cranky
 
Okay this is it. It is done other than the workshop challenges and ideas section. If someone wants to look over it that would be super swell
 
I find your lessons pretty clear and sound!
I really learned a thing or too from here.
Here's something I made, I just used cliffs in this in this map.
2364d2.png
 
First off, your cliffs need to be way more curvy and drastic.

Though there are some other key errors that I would like to point out.

For starters, the map is rather confusing. There is no clear objective on where to go. The best kind of mapping is mapping that shows the player a direction. This doesn't have to be a linear point A to point B direction, but there should be subtle hints and clues on where to go next. I think a great example of one of the worst maps is FF10 Calm Lands or Giant Ass Plain. The map was a huge turnoff. The reason being is because they gave us this huge space with no direction or motive. The idea is to lead the player to an area and have multiple branches or side branches along the way so that the player can explore if he desires. Dont force the player to wander around aimlessly, let him decide. I know its just cliffs but even with autotiles this might be a little confusing.
-This is something I will address next workshop.

That was a tangent.
Anyways, back to the cliffs. First off, never not end a cliff. A cliff should have a beginning and an end. Not adding the border does not give the effect of a hill. It just looks odd.

Make sure that all of the cliffs are the same size and correspond with one another. Some of your cliffs do not match the same height as others, creating confusion.

There are a bunch of straight areas. The whole point is to not give linearity. (this is something that will be addressed later in the Dangers of Symmetrical Mapping)

Vary your cliffs up. Add curve and wave. Dont give us a straight piece. Seeing lines will instantly kill the immersion of the map.

Remember to add more cliffs. Try to be as detailed as possible. Add mini cliffs on the cliffs!

I will redo your map in a little while or maybe tomorrow and give an example on how to do it.
 
cliffedit1.png

here is a quick example
I try to lead the player down a select path by creating an eye path
you dont want the player to be able to hit every part of the map, that would make it convoluted
The detailing should be from the cliffs. It should move the eye in the direction you want the player to go

you also used a bunch of different elevation. When it comes to elevation, keep it simple. You dont need a bunch of cliffs different heights. I usually just increase mine by increments of 3.

You can leave plenty of room to walk and have a detailed looking map. That is the power of cliffs.

There is no special formula on how to map cliffs. You just sort of have to roll with it. The idea is to not have a bunch of 90 degrees or 45 degree lines. This can be achieved by varying straight cliffs and turn cliffs.
 
Of course, this just doesnt apply to cliffs. This includes things like trees and other path blockers as well. The idea is that you can create detail in the walls and in the form more so than you can on the actual playing field.

166168-fall-8.jpg


A great example
Look how the trees guide the player and add detail
The method in this and how much you can get away with is a lot different than the RTP.
This is something that will be elaborated later, but many people forget that they are working with 32x32 tiles and not 16x16 or 8x8.
So when they copy their FF room tile by tile, it is actually bigger leaving a lot more space. The bigger the tiles, the more you have to worry about filling a map using cliffs and stuff. Bigger tiles mean bigger negative and positive space (this is a silly mapping term that i use and will be also explained later)~
 
Thank you very much for your feedback.
So far I've learned from cliff mapping that:
*The cliffs should lead the player along a path, but nothing straight, that means to make variations of paths
using cliffs.
*Try to make a pattern of elevations for the cliffs(3 by 3 recommended).
*Also try to add detail to the cliffs(by adding mini-cliffs/other cliffs)

This workshop's very good, bacon! Thank you!
 
Thanks, Hopefully others will post so that i can help them. Or they can add their own thing.
And i am glad you learned
because learning is grand
just so grand
oh so grand~
 
What do you mean by lighting?
If you mean why you shouldn't use lighting in 95% of your maps then yes, this is a very good idea. I will definitely do that in the future along with everything else~

If you are looking on how to do it, Im not an expert on it:
viewtopic.php?t=15030.0
but Calibre did a tutorial~
 

Thank you for viewing

HBGames is a leading amateur video game development forum and Discord server open to all ability levels. Feel free to have a nosey around!

Discord

Join our growing and active Discord server to discuss all aspects of game making in a relaxed environment. Join Us

Content

  • Our Games
  • Games in Development
  • Emoji by Twemoji.
    Top