
Ok some of you might already know that its possible to make maps in a very singular form for VX with the parallaxes.
To understand more about Paralaxes you can visit this tutorial made by Marcus: http://www.rmxp.org/forums/index.php?topic=42711.0
RMVX with this system can make an actual drawing fit in the game so you set the passability: but hey not all of us are artists. And even me, who draws incredibly nice wouldnt make a game full of drawings it would take so much time to create it.
Some ppl complain about the way VX works but the parallaxes makes RTP much useful and posiblities with parallaxes are INFINITE (i love the word sorry).
What do you need for pro mapping?:
1.RMVX
2.An understanding of the parallaxes
3.Photoshop
4.Understanding Grids (http://www.rmxp.org/forums/index.php?topic=20828)
3.Autotile sets made by me. (http://www.rmxp.org/forums/index.php?topic=43724.0)
Basic PRO Mapping
Getting Started:
Open photoshop make a new project and turn on the grids and set them for 32 pixels with only 1 division to simulate the tiles. This will make our map be in an appropiate size to modify in map editor
You must know the size of your map, lets say the map you need is 17x 17 that means that it will have 17 tiles height and 17 tiles width
take out calculator and if our tiles are 32 pixels change size of document 17x32 = 544 so change the image size to 544x544 pixels (menu Image >Image Size)Â Â Make sure your size is in pixels
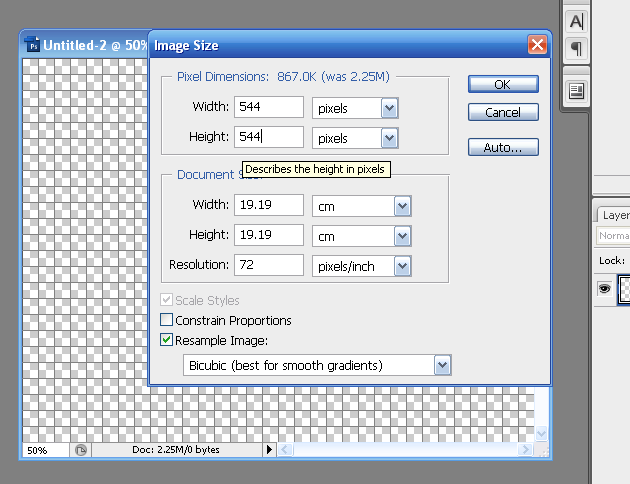
Constrain Proportions must be off to change the size properly
Ok now we have our document with a nice grid. Make sure the Snap tool is "ON". Look in menu View > snap
First Layer
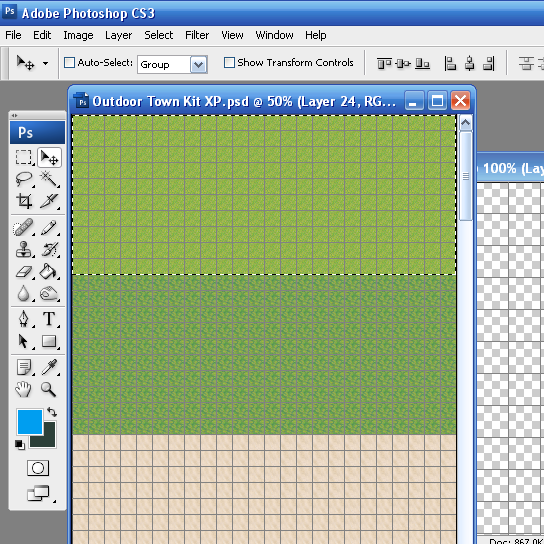
Now open any resource of tilesets you may want to use. If we are going to do this i recomend doing a special file containing pre made stuff so its faster, ill explain :
ill open 001Grassland-01.png from our old friend XP ^^ and it will have grid, if not turn it on ("Control+H)
and then We will use our Rectangular Marquee tool to select the desired tiles and drag them to our empty file with the move tool (just press M to change to that tool)

now we will drag the grass tile to the empty folder, it should align automatically to any tile with the snap tool .so now we have 1 tile we have to copy the tile and paste it in the whole document, (select with marquee tool, copy, paste, move)
For this reason is that i recomend a file with premade stuff, including at least a big set of floor tiles so you just select all the tiles and copy, This way you need to paste less times, and its easier
now we select tiles we want in our composition: Everything that cannot be on above our character can be put in this layer
For this part of the tutorial were gonna keep it simple and we wont be using roads or autotile-made stuff, we will add it directly from the editor later but we will make make it look nice. Just select tiles with the markee tool and drag to copy paste, drag trees, rocks, whatever u know the character canot pass or that will never be above the character this way we can even rotate stuff the character wont be able to pass :D like i did with the log in this map.
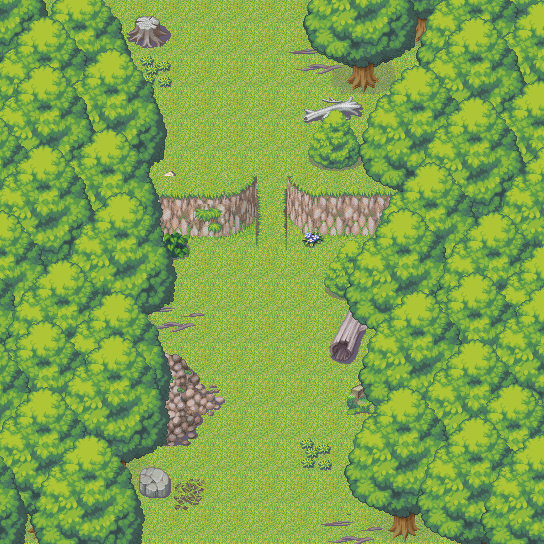
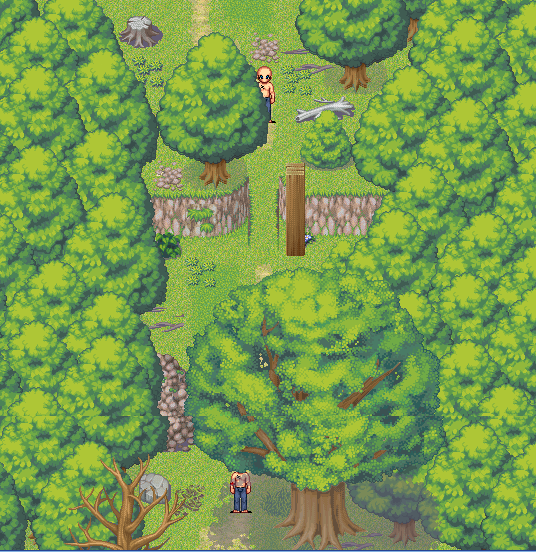
we could have something like this in the end
Now that we have this, we will save it as PNG and move it to the "Paralaxes" folder in graphics of your game folder YOURGAME>Graphics>Parallaxes.
Then open your game again that we already know that have a 17x17 tile size, in the name of the map in the editor right click and select Map properties, now to the right youll see Parallax Background turn on where it says Show in the editor, then where it says graphic change the graphic and look for our just created map that we saved in parallaxes folder
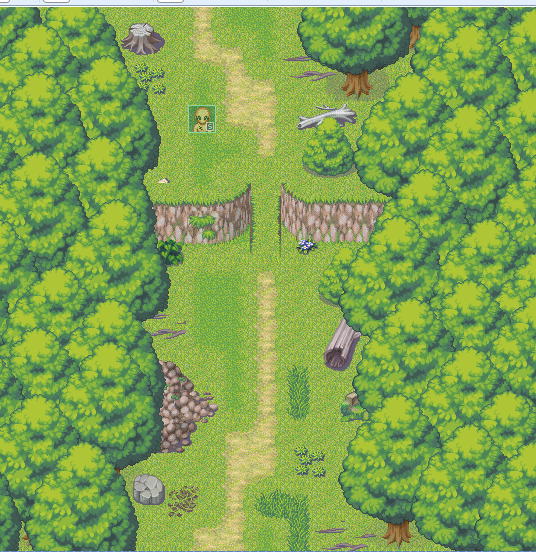
And this is the result WOAH! we have the map there
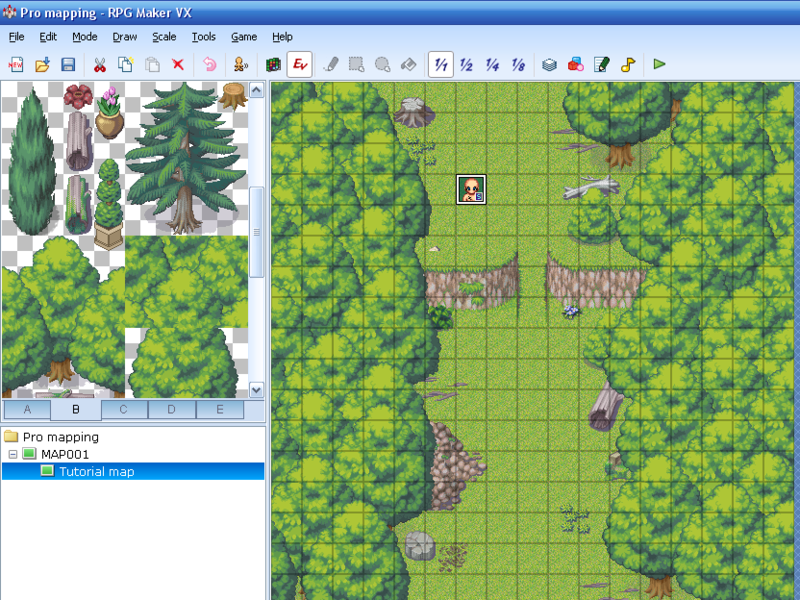
Now for this to work the way i do remember you must have my Mapping Set XP http://www.rmxp.org/forums/index.php?topic=43724.0
Go to the Tileset A and there are two lines were gonna edit right away. The passable and non passable areas in transparent. Go to the passability options and change the ones in the NON line to X so you cannot walk in those areas.
[img]http://i63.photobucket.com/albums/h144/busbuzz/tut6.png
Passability
Now go out of the passability editor and were gonna add transparent non passable tiles to the areas our character wont be able to walk on. In this case are the trees, the wall, the pile, the rocks, anything you decide the character wont be able to walk on set it. This is hard because we cannot see what we put, i recomend the rectangle tool for large areas so you dont forget any tile.
This must be made first because if you put these tiles after you have 3rd layer tiles when putting them they will erase the 3rd layer tiles
2nd Layer
You can only add autotiles where theres only clean grass and nothing of the other layer, because these autotiles doesnt have transparency and cant have transparency, so it will merge with the grass only if its an autotile designed to merge with the grass- Now we have some autotiles to make the empty floor better in tile A, because we have grass in the background we may use autotiles like roads for grass, the large grassy area, darker grass and flower autotiles, use them so it looks something like this:
3rd Layer
Now for the last layer we will add what we want above our character, like IN-MAP trees probably roofs, statues, and anything that could be above our character. Dont forget to go to passability options and edit everything X means non passable, O means passable, * means layer above characters
in the end we will have something like this
Open photoshop make a new project and turn on the grids and set them for 32 pixels with only 1 division to simulate the tiles. This will make our map be in an appropiate size to modify in map editor
You must know the size of your map, lets say the map you need is 17x 17 that means that it will have 17 tiles height and 17 tiles width
take out calculator and if our tiles are 32 pixels change size of document 17x32 = 544 so change the image size to 544x544 pixels (menu Image >Image Size)Â Â Make sure your size is in pixels
Constrain Proportions must be off to change the size properly
Ok now we have our document with a nice grid. Make sure the Snap tool is "ON". Look in menu View > snap
First Layer
Now open any resource of tilesets you may want to use. If we are going to do this i recomend doing a special file containing pre made stuff so its faster, ill explain :
ill open 001Grassland-01.png from our old friend XP ^^ and it will have grid, if not turn it on ("Control+H)
and then We will use our Rectangular Marquee tool to select the desired tiles and drag them to our empty file with the move tool (just press M to change to that tool)
now we will drag the grass tile to the empty folder, it should align automatically to any tile with the snap tool .so now we have 1 tile we have to copy the tile and paste it in the whole document, (select with marquee tool, copy, paste, move)
For this reason is that i recomend a file with premade stuff, including at least a big set of floor tiles so you just select all the tiles and copy, This way you need to paste less times, and its easier
now we select tiles we want in our composition: Everything that cannot be on above our character can be put in this layer
For this part of the tutorial were gonna keep it simple and we wont be using roads or autotile-made stuff, we will add it directly from the editor later but we will make make it look nice. Just select tiles with the markee tool and drag to copy paste, drag trees, rocks, whatever u know the character canot pass or that will never be above the character this way we can even rotate stuff the character wont be able to pass :D like i did with the log in this map.
we could have something like this in the end
Now that we have this, we will save it as PNG and move it to the "Paralaxes" folder in graphics of your game folder YOURGAME>Graphics>Parallaxes.
Then open your game again that we already know that have a 17x17 tile size, in the name of the map in the editor right click and select Map properties, now to the right youll see Parallax Background turn on where it says Show in the editor, then where it says graphic change the graphic and look for our just created map that we saved in parallaxes folder
And this is the result WOAH! we have the map there
Now for this to work the way i do remember you must have my Mapping Set XP http://www.rmxp.org/forums/index.php?topic=43724.0
Go to the Tileset A and there are two lines were gonna edit right away. The passable and non passable areas in transparent. Go to the passability options and change the ones in the NON line to X so you cannot walk in those areas.
[img]http://i63.photobucket.com/albums/h144/busbuzz/tut6.png
Passability
Now go out of the passability editor and were gonna add transparent non passable tiles to the areas our character wont be able to walk on. In this case are the trees, the wall, the pile, the rocks, anything you decide the character wont be able to walk on set it. This is hard because we cannot see what we put, i recomend the rectangle tool for large areas so you dont forget any tile.
This must be made first because if you put these tiles after you have 3rd layer tiles when putting them they will erase the 3rd layer tiles
2nd Layer
You can only add autotiles where theres only clean grass and nothing of the other layer, because these autotiles doesnt have transparency and cant have transparency, so it will merge with the grass only if its an autotile designed to merge with the grass- Now we have some autotiles to make the empty floor better in tile A, because we have grass in the background we may use autotiles like roads for grass, the large grassy area, darker grass and flower autotiles, use them so it looks something like this:
3rd Layer
Now for the last layer we will add what we want above our character, like IN-MAP trees probably roofs, statues, and anything that could be above our character. Dont forget to go to passability options and edit everything X means non passable, O means passable, * means layer above characters
in the end we will have something like this
")