Envision, Create, Share

Welcome to HBGames, a leading amateur game development forum and Discord server. All are welcome, and amongst our ranks you will find experts in their field from all aspects of video game design and development.

Bloom Shader

[ Original blog post battleworldrpg.net Jul 14 2013 ]

The new shading system (In Battle World RPG) allows for some rather cool post-processing effects, one such effect that I wanted to try out is a bloom shader (Sometimes called a glow shader).

The effect has been well described as it is a rather simple effect to create and it require 1 extra pass of the draw call.

The Effect

The inspiration for this effect is the Burmecia scene from Square’s Final Fantasy IX (Released for PlayStation in 2000), in this area of the game the scenes are all raining and set during a later time of day, so we have a dark, wet environment with what we can presume is moon-light creating the scene.

tumblr_inline_mpx79z05Db1qz4rgp.jpg


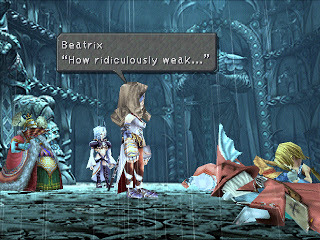
In this shot, we can see that the characters with lighter costumes appear to have a glow on them, this effect wasn’t very easy to do on the original PlayStation so I would guess that the game simply does a texture swap or a palette swap to lighten certain areas of textures, or perhaps I am wrong and there is no effect but it is insinuated with the tone of the background scene.

I plan to have a similar effect for rainy and dark scenes in Battle World, so using this as my inspiration I went and created a real glow effect.

Battle World RPG’s Implementation

Straight away I began by implementing a second layer to the materials of the objects in the game, this layer is called the glow layer and it is a texture that simply highlights the areas that we want to glow with the desired colour of the glow.

tumblr_inline_mpx7rsJjQL1qz4rgp.png
tumblr_inline_mpx7rwd6f51qz4rgp.png


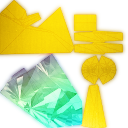
The base texture and the glow texture of Gus’ Diamond-Blade model. For this texture I set the alpha to black, increased the colour contrast and then applied a 50% alpha black texture on top to darken the entire image, this reduces the strength of the glow.
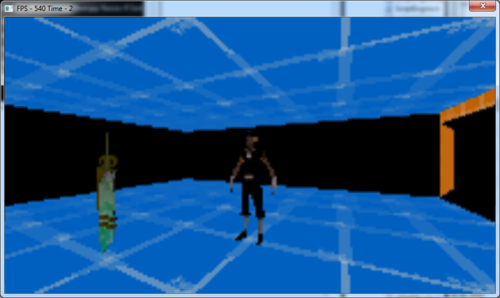
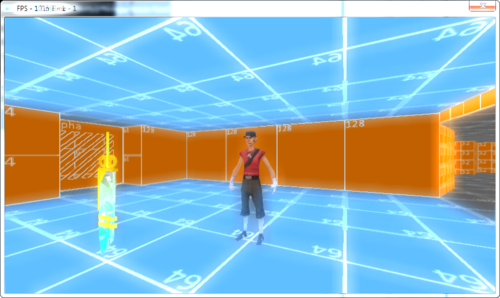
Render Pass One

The first step is to render the world normally.


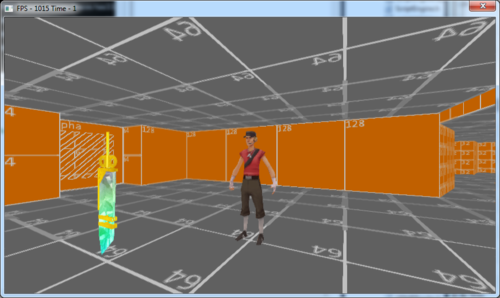
[Credit to Tommy Tallian for the low-poly TF2 scout model, used for testing]
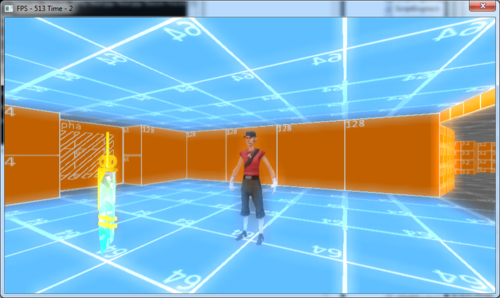
Render Pass Two

We then render the world again using the glow-layer of all the objects, I actually render this stage to a buffer that is 1/4 of the size of the colour buffer, this creates a blur on it’s own and reduces the performance cost of the next stages. Please ignore the frame-rate as this is still a WIP effect.


Render Pass Three

This is one of two intensive blur effects, first I blur the glow buffer vertically.
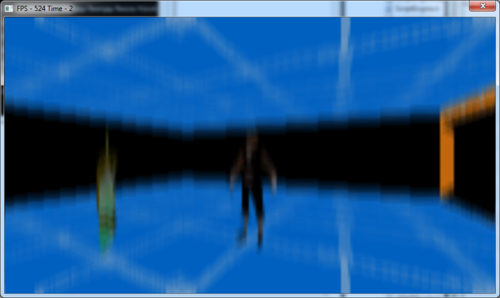


Render Pass Four

Then I blur the buffer again horizontally.
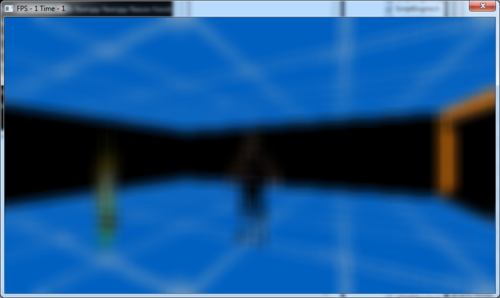


Final Pass

Finally, I use an additive blend to apply the glow-map onto the colour buffer.


Trivia

You can actually take the first pass and blend the fourth pass together in photoshop with additive blend to get the exact same result.

 
I just wanted to say this is very cool. There's not much to comment on but i like how you took the time to explain everything. I know that this post is probably trivial but I wanted to let you know that I read all of the articles you post and they are always well-written.
 
Yes.
I had written a comment two days ago and was looking something up when my internet bummed out.

I'll try again tomorrow. Could you post the shader code?
 
Toams":2mrd8etv said:
Yes.
I had written a comment two days ago and was looking something up when my internet bummed out.

I'll try again tomorrow. Could you post the shader code?
The shader code has a lot of custom pre-processing/fixed values that are unique to my engine, so the most I can do is post the blur vertical and horizontal shaders for everyone to use - even they have custom 1/4 resolution texture hard-coded, in the future I will have the buffer size configurable and this 1/4 size setting will be dynamic, but for now here's the blurs as they are.

Excuse the lack of GLSL standards, I haven't optimised any of the shaders and I plan on making them all GLSL 1.40 compliant.

#define TYPE solid is a bwrpg engine specific optimisation, it has no effect on the shader so you can ignore it or remove it, of course if you are using the bwrpg engine you leave the line in ;)
xi_inverseResolution is a vec2() of the inverse size of the target frame buffer
xi_textureSample2 is the glow buffer

Horizontal blur
C:
<div class="c" id="{CB}" style="font-family: monospace;"><ol><span style="color: #339933;">#define TYPE solid


vec2 offsetArray[<span style="color: #cc66cc;">7];


<span style="color: #339933;">#define STEP_ONE    ( 0.25 )

<span style="color: #339933;">#define STEP_TWO    ( 0.75 )

<span style="color: #339933;">#define STEP_THREE  ( 1.25 )


<span style="color: #993333;">void main() {

    offsetArray[<span style="color: #cc66cc;">0] = vec2( <span style="color: #cc66cc;">0.0, <span style="color: #cc66cc;">0.0 );

    offsetArray[<span style="color: #cc66cc;">1] = vec2( -STEP_ONE * xi_inverseResolution.<span style="color: #202020;">x, <span style="color: #cc66cc;">0.0 );

    offsetArray[<span style="color: #cc66cc;">2] = vec2( STEP_ONE * xi_inverseResolution.<span style="color: #202020;">x, <span style="color: #cc66cc;">0.0) ;

    offsetArray[<span style="color: #cc66cc;">3] = vec2( -STEP_TWO * xi_inverseResolution.<span style="color: #202020;">x, <span style="color: #cc66cc;">0.0 );

    offsetArray[<span style="color: #cc66cc;">4] = vec2( STEP_TWO * xi_inverseResolution.<span style="color: #202020;">x, <span style="color: #cc66cc;">0.0 );

    offsetArray[<span style="color: #cc66cc;">5] = vec2( -STEP_THREE * xi_inverseResolution.<span style="color: #202020;">x, <span style="color: #cc66cc;">0.0 );

    offsetArray[<span style="color: #cc66cc;">6] = vec2( STEP_THREE * xi_inverseResolution.<span style="color: #202020;">x, <span style="color: #cc66cc;">0.0 );


    vec4 blurColour = vec4( <span style="color: #cc66cc;">0.0, <span style="color: #cc66cc;">0.0, <span style="color: #cc66cc;">0.0, <span style="color: #cc66cc;">0.0 );


    <span style="color: #b1b100;">for( <span style="color: #993333;">int ii = <span style="color: #cc66cc;">0; ii < <span style="color: #cc66cc;">7; ++ii ) {

        blurColour += texture2D( xi_textureSample2, clamp( gl_TexCoord[<span style="color: #cc66cc;">0].<span style="color: #202020;">xy + offsetArray[ii] * <span style="color: #cc66cc;">3.0, vec2( <span style="color: #cc66cc;">0.001, <span style="color: #cc66cc;">0.001 ), vec2( <span style="color: #cc66cc;">0.999, <span style="color: #cc66cc;">0.999 ) ) );

    }


    blurColour *= <span style="color: #cc66cc;">0.1429; // divide by 7


    gl_FragColor = blurColour;

}

Vertical blur is the same except the offsetArray has the X and Y flipped:
C:
<div class="c" id="{CB}" style="font-family: monospace;"><ol>    offsetArray[<span style="color: #cc66cc;">1] = vec2( <span style="color: #cc66cc;">0.0, -STEP_ONE * xi_inverseResolution.<span style="color: #202020;">x);

    offsetArray[<span style="color: #cc66cc;">2] = vec2( <span style="color: #cc66cc;">0.0, STEP_ONE * xi_inverseResolution.<span style="color: #202020;">x ) ;

    offsetArray[<span style="color: #cc66cc;">3] = vec2( <span style="color: #cc66cc;">0.0, -STEP_TWO * xi_inverseResolution.<span style="color: #202020;">x );

    offsetArray[<span style="color: #cc66cc;">4] = vec2( <span style="color: #cc66cc;">0.0, STEP_TWO * xi_inverseResolution.<span style="color: #202020;">x );

    offsetArray[<span style="color: #cc66cc;">5] = vec2( <span style="color: #cc66cc;">0.0, -STEP_THREE * xi_inverseResolution.<span style="color: #202020;">x );

    offsetArray[<span style="color: #cc66cc;">6] = vec2( <span style="color: #cc66cc;">0.0, STEP_THREE * xi_inverseResolution.<span style="color: #202020;">x );

Also to note, this code is adapted from various free-to-distribute online sources, this method for blurring is well-known so there are probably better/cleaner implementations out there.

The final stage is to blend it with the colour buffer with the new bloom buffer.

xi_textureSample3 is the buffer where we store the blurred result.
xi_textureUV0 is the screen's rectangle texture co-ordinates.
xi_textureSample0 is the colour buffer where we rendered the world normally.

C:
<div class="c" id="{CB}" style="font-family: monospace;"><ol><span style="color: #339933;">#define TYPE solid


<span style="color: #993333;">void main() {

    vec3 bloom = texture2D( xi_textureSample3, xi_textureUV0 ).<span style="color: #202020;">rgb;


    gl_FragColor = vec4( texture2D( xi_textureSample0, xi_textureUV0 ).<span style="color: #202020;">rgb + bloom, <span style="color: #cc66cc;">1.0 );

}

You could cheat and just use offsetArray[ii].yx in the loop to avoid having to swap those lines, but I don't think this is as readable as just showing that X and Y are swapped.

To note: There is no reason to combine the alpha, so we only take the rgb channels and we set the alpha to 1.0.

Why do we blur horizontally and vertically?
The obvious question is why not blur in a single shader, rather than with two shaders. Simply put, because we can only set one fragment at a time in the shader pipeline if we were to read it's neighbouring fragments in two directions the blur patten would be a + shape, the horizontal blur makes it a - shape and when you vertically blur that you get a square.

The fix for this is to increase the number of fragment reads so the blur takes a square reading of it's neighbouring fragments, however this will cut performance to the point where it's faster to run two post-processing shaders.
 
I always found the bloom effect to be a gimmicky thing rather than actually adding things.
Mostly because of the fact that it's not really correct. It makes things glow that would never glow, and therefore distracts from some material expression aspects.
For example metal is percieved as metal because of the harsh reflections and the sharp contrast fluctuations. If you would make that glow it'd have less contrast and would be less metal-y.

The could be applied to the shiny parts of the metal in order to make it appear as if there's some dust on the camera or something that you're viewing the scene with.

Anyway, nice going, well-documented! I love your posts.
 
Toams":1stqplrk said:
I always found the bloom effect to be a gimmicky thing rather than actually adding things.
Mostly because of the fact that it's not really correct. It makes things glow that would never glow, and therefore distracts from some material expression aspects.
For example metal is percieved as metal because of the harsh reflections and the sharp contrast fluctuations. If you would make that glow it'd have less contrast and would be less metal-y.

The could be applied to the shiny parts of the metal in order to make it appear as if there's some dust on the camera or something that you're viewing the scene with.

Anyway, nice going, well-documented! I love your posts.
In the real life you will only find the bloom effect where strong light has been refracted or strong light is reflected in a dark environment (this is more in line with HDR style lighting though, where the eye adjusts for how much incoming light there is).

Church stained glass windows with direct sunlight will bloom where the light is refracted and street lights at night will bloom where your eye has adjusted for the darkness, in computer games it should be used where it looks good, rather than where it should be, and a lot of the time it is used everywhere and ends up looking terrible.

The diamond blade in my shot above is probably the most correct usage as it's semi transparent and would logically refract light, so a strong light would bloom it.
 

Thank you for viewing

HBGames is a leading amateur video game development forum and Discord server open to all ability levels. Feel free to have a nosey around!

Discord

Join our growing and active Discord server to discuss all aspects of game making in a relaxed environment. Join Us

Content

  • Our Games
  • Games in Development
  • Emoji by Twemoji.
    Top